NFTs
Overview
The Content Fabric uses NFTs as means of asserting ownership and access to content. NFTs can be used as digital collectibles (tradable), content ownership tokens representing access to one or several media objects, subscriptions, memberships, etc.
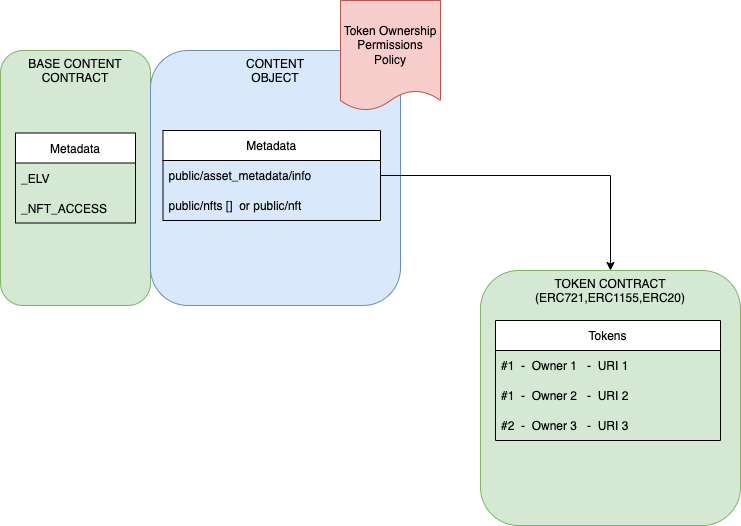
The general structure of a Content Fabric NFT consists of one content object, conventionally called the NFT Template and a standard ERC721/ERC1155-compatible contract that is bound to the NFT Template through its token URI.
NFT Configuration
The below documentation serves as instructional material for configuring NFTs using the Eluvio Fabric Browser and the elv-live-js CLI.
To create an NFT and make it available for purchase or claim, follow these steps:
-
Create the NFT Template object with primary media
-
Configure additional NFT metadata and media
-
Create the NFT contract bound to the NFT Template object
-
Add the NFT Template as an item on the marketplace and store
-
Publish the changes
Steps 1-3 are covered in detail below, while steps 4 & 5 are covered in the marketplace configuration documentation.
Initial NFT Template Setup
Video/Audio as Primary Media
- Ingest video/audio with clear or public access DRM. (Refer to ingest documentation if needed.)
- Click the Manage button, select the Form tab, then change the Name to
NFT Template - NFT's Name(by convention) and “Type” toTenant's Name - NFT Template, then click “Submit”. - Prepare the thumbnail image file. This is preferably of the first frame of the video, since the thumbnail displays while the video is loading, then transitions into the video - using the first frame of video ensures a smooth transition.
- On Mac, one way to do create a file with the first frame of video is to open the video in QuickTime Player, select Edit > Copy (⌘C), open the Preview app, select File > New from Clipboard (⌘N), then File > Save (⌘S) the image, optimally as a medium-quality JPEG file.
- Alternatively, with the FFmpeg CLI tool, one can generate the first frame as an image this way:
ffmpeg -i "Acme_WEB_PROMO.mov" -vframes 1 "Acme_WEB_PROMO.jpg"
Images as Primary Media
These image and other media types are supported as
- Within the
Tenant's Name - Title MezzaninesLibrary, click the Create button (may be under the More Options dropdown button). - Enter
NFT Template - NFT name(by convention), selectTenant - NFT Templateas type, then Submit. - Set group permissions under the Access Groups tab. Generally, at the minimum give the
Tenant - Content Adminsgroup permission to access and manage the object by clicking Manage Group Permissions, selecting that group from the dropdown if not already selected, ticking Manage, and clicking Submit. - In the Files tab, click Upload Files. Browse to the media file, click Open, and then click the green Save Draft button.
- Click the Manage button and under the App tab set the Media Type to the appropriate type under NFT Details.
- If the type is an image and a different one should be shown for the thumbnail image in the drilldown view after the NFT is minted, then choose the drilldown view image under Media File. (Note that this drilldown image will still be visible to those browsing the secondary market or the leaderboard view of the user’s wallet.) If the same image should show, leave the Media File field blank.
- If the type is not an image, set the index.html or other file to be the Media File.
- Click the Save button, preferably include a commit message, then click OK.
Add NFT Metadata
Set Thumbnail Image
- Upload the thumbnail image file in one of two ways:
- In the Files tab, click Upload Files. Browse to the media file, click Open, and then click the green Save Draft button.
- Click the Manage button, then under the Form tab click Browse, select the image file, and Save - this sets the image that will show for the NFT Template in the Fabric Browser as well, which is generally recommended.
- Go to Manage, then under the App tab select the NFT image file under Image in the NFT Details section, then click Save, preferably include a commit message, then click OK.
Set NFT Template Metadata
Steps:
- In the NFT Template detail view, set the Permissions dropdown to “Publicly Listable”.
- Click the Manage button, then under the App tab add the metadata below.
-
Mandatory fields:
- Title & Display Title (for internal use) should usually match
- Change Slug to match Title if necessary
- Name (internal) & Display Name (public) should usually match
- Edition for what will show in smaller text under the NFT name (this distinguishes the NFT from others that may share the same name)
- Description for longer text that will show under the NFT name and edition
- Playable on unless primary media type is not video or audio
- Has Audio off unless primary media type is a video with audio (in this case video will not autoplay, but video will automatically loop once played regardless of this setting)
-
Optional fields:
- Creator/Copyright/Created At
- Pack Options as applicable (see below)
- Other fields:
- Contract and Total Supply will be auto-populated when contract is added
- If copying from another NFT Template object, change template_id (accessible in Form metadata) to something different
- Click Save, preferably include a commit message, then click OK.
Pack Metadata
“Packs” are NFTs that can be burned (“opened”) in exchanged for one or more other NFTs, at the NFT owner’s discretion. The new NFT “contents” specified in the Pack NFT’s metadata may be predetermined or randomized. If randomized, then each “item slot” specified can contain several possible NFTs with integer probabilities from 0 to 100. The values of the probabilities of all items in a slot should add up to 100. By design, a pack when opened will not contain duplicates, regardless of configuration.
To toggle the Pack feature, tick Is Openable under Pack Options. These are the available options that follow:
- Pack Generator specifies the algorithm that will be used to randomize pack contents.
- If “preset” then the pack contents are predetermined; this will cause distribution to roughly match the probability regardless of the number already opened (subject to random variability).
- If “random” then the pack contents are determined at mint time; this will cause the distribution to vary in a complex fashion subject to what has already been minted from other pack opens. For most configurations, the distribution will not trend towards the specified probability until the lattermost packs are opened.
- Open Button Text can be used to specify the text that the user sees on the button for opening the pack if the idea of a “pack” is not intended, then this text could for example be “Reveal Experience”.
- Hide Default Text removes the message that displays during minting, which allows the “Open Animation” to occupy more of the screen.
- Use Custom Open Text allows changes to the message that displays during and after minting.
- Open Animation, if specified, is what will play in a loop while the pack contents are minting. If not specified, an animated progress spinner loop is used.
- Reveal Animation, if specified, is what will play once when the pack contents have been minted, before the contents are revealed.
- Item Slots specify pack contents as described above.
Additional Media Metadata
NFTs on the Content Fabric may feature media that is not considered “primary” - access to this “additional media” via ownership may in fact be the main value proposition of owning the NFT, since it is ordinarily not possible to see additional media unless one is the owner. Additional media appears below the primary media and metadata in the drilldown view for the NFT in a user’s wallet.
Categorization
There are many ways that additional media can be organized and displayed.
- At the top level, the additional media can be organized into “Sections” or a simple “List”. If it is a list, then it can display as “Media” or as an “Album”.
- The media list view is the simplest. The user can navigate along a list of different additional media.
- The album list view still uses a simple list of media, but displays it with the appearance and controls of a music album.
- The sections view allows for further levels of categorization beyond a simple list.
- If sections are being used:
- There is a “Featured Media” area for items that should be highlighted in a tile above any other additional media. They can have a custom button and a custom background image. Multiple Featured Media items will appear side-by-side when viewing them on desktop.
- There is a “Media Sections” area for the rest of the items, which are hierarchically ordered into Sections, Collections, and Media/Albums (can go one more level with Galleries if desired, as mentioned below).
Media Attributes
Each Media entry, whether featured or not, can have the following attributes.
- Name for display.
- Subtitles for display under the name.
- Key that is used as reference to the media when, for example, the media is being referenced in an HTML experience.
- Description for display under the subtitles.
- Image to serve as a thumbnail during navigation.
- Image Aspect Ratio of the thumbnail, generally speaking, so that unexpected cropping does not occur
- Requires Permissions should be ticked if the content is intended to be access-restricted, such as for a DRM-enabled video. Setting up these permissions is a separate area of documentation.
- Media Type can be anything supported. A Media Link field will appear if a content object is referenced (video/audio), else a Media File field will appear if a file is referenced.
- In the case of an image media type, do not specify in the Media File field if the image is the same as the thumbnail.
- There is a special media type called Gallery. This type serves as an additional level of categorization in the form of an embedded list of images and/or videos.
- If the media type is video or audio, it is possible to specify one or more offerings - see the ingest documentation for more information.
- Locked refers to whether the media should be viewable contingent on viewing of another piece of media (or the piece of media itself via different means, e.g. an experience embed). When toggled, various alternative display options for the “Locked” state appear, and the ID of the unlocking media can be specified.
Prepare NFT for Minting
Create and Bind New Contract
Prerequisites:
- elv-live-js
- the private key for the tenant’s contract owner account (starts with 0x)
- the tenant ID (starts with iten)
Run the following commands:
-
Set your key
export PRIVATE_KEY=<owner key> -
Create the contract and bind it to the NFT Template object.
./elv-live nft_add_contract <NFT Template object ID> <Tenant ID> <cap> <NFT name> <NFT symbol> --hold <hold duration in seconds>Where:
capmeans the same as “supply” - the maximum times this NFT can be mintedname&symbolcan be any string without spaces, but should usually be the same and be prefixed with “TEST” if the contract is exclusively for testing.- set
--holdto 1 for no hold (default is 7 days) - the arguments set at this stage, including total supply of NFT and length of hold, cannot be changed later on without creation of a new contract, so be sure you have thought through how the contract will be used.
This command includes the contract address in its output, if successful.
-
Verify the newly created contract’s details (this comma)
./elv-live nft_show <contract address>
This command can also be used later on to show the number minted, the number burned, and (with the --show_owners flag) the details of each minted token.
-
Build the final NFT metadata in the object metadata, based on what has been set. All metadata should be entered before running this command. If the NFT’s basic metadata is changed after running this command, it must be run again in order for the updated metadata to appear correctly.
./elv-live nft_build <ID of library containing NFT Template> <NFT Template object ID>
Edit NFT Metadata After Minting
It is possible to alter most of the metadata and media associated with an NFT even if the supply has been partially or fully minted. See the advanced section: Change/Set NFT Token URI